


With many of our cardigans, the button placket is knitted directly into the knit. To ensure the finish is clean and stable, we finish the button placket on both sides with an i-cord edge.
We also use the i-cord edge for braces and ears on hats - basically whenever we need a smooth side edge where no further stitches are picked up.
Here you will find a collection of all our patterns that use the i-Cord edge: All patterns with an i-Cord edge
Here we show you how to knit it:
1st step: Knit the first 2 stitches from the right side. Then knit the row in pattern until 2 sts before the end of the row.

2nd step: Slip the last 2 stitches of the right side without knitting, as if to purl, with the thread in front of the work.

3rd step: Knit the first 2 stitches of the back row on the right. Then knit the pattern to 2 stitches before the end of the row.

4th step: Slip the last 2 stitches of the back row without knitting, as if to purl, with the yarn in front of the work.

Repeat these 4 steps along the entire length of the knitted piece.
Basically, this technique consists of only two steps - always knit the first 2 stitches on the right, always knit the last 2 stitches without knitting, slip the thread in front of the work. It is important that the first two stitches in the back row are always knitted on the right and not on the right side and purl on the back row - this is a common mistake, which is why we have differentiated between the front row and the back row here.
Equally important is that the thread hangs 2 stitches before the end of the row in front of the work. If you turn the work and knit the first 2 stitches (= the stitches you slipped without knitting at the end of the last row), the thread that is now hanging on the wrong side pulls them backwards and they curl up a bit. This creates the characteristic braided edge that defines this i-cord edge.
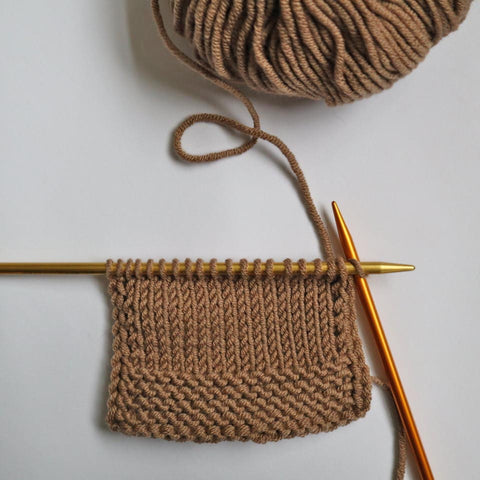
You can use the i-cord edge with any pattern. In our test piece we knitted the first few centimeters in garter stitch (ie K in front and back row) and then continued in classic stocking stitch (K in front row, P in back row). We didn't change the i-Cord edge. As you can see, it prevents the edges of the stocking stitch part from curling up, so it is also a good finish for stocking stitch parts.
We also use the i-cord edge to finish ribs - here we K the first 2 sts (the i-cord stitches) and then start the rib again with a knit stitch in the third stitch, this makes the transition cleaner than with a purl stitch.